The Nitty Gritty of Authentication & Authorization Using Bcrypt and JSON Web Tokens
Author
Elle J
Date
Aug. 22, 2019
Time to Read
24 min
Prerequisites
- ★Node.js (basic knowledge)
This article will explore some common ways of securing Node.js applications using the cryptographic library bcrypt and JSON Web Tokens, walk through how to send and handle authentication and authorization requests, look at the nitty gritty details of some operations, as well as best practices.
A more detailed overview of what we will touch upon is the following:
- The distinction between authentication and authorization.
- How to handle passwords in a more secure way.
- Understanding hashing and the cryptographic library bcrypt.
- Why and how tokens are used.
- What a JSON Web Token is and how it is generated and verified.
- How to implement the above bullet points when building APIs in Node.js.
Authentication vs. Authorization
Two concepts to wrap our heads around are authentication and authorization. The reason I can’t log in to your social media account is because of authentication. When I try to log in with a username and password the server starts the process of evaluating if the two belong together. If they don’t, my malicious attempt fails and the server responds with an error.
Now, let’s say you are logged in to your account (thus, you have been successfully authenticated), does that mean you can go ahead and delete your friend’s images? Or update somebody else’s status? This is the concept of authorization. Authorization is used to determine whether or not the user has permission to perform a particular operation or access whatever they are trying to access. So when you click the delete button next to one of your images we need some way of proving that the request sent off to the API is coming from an authorized source. So remember, never ever trust the client without some kind of verification! This is where the JSON Web Token (JWT) comes into play. A JWT is essentially an encoded string that stores data about the user and is returned to the client once logged in to use as a form of ID card. More on this in just a bit.
The diagram below is an overview of the communication between the browser (the client) and the server, the details of which are the main focus of this article.
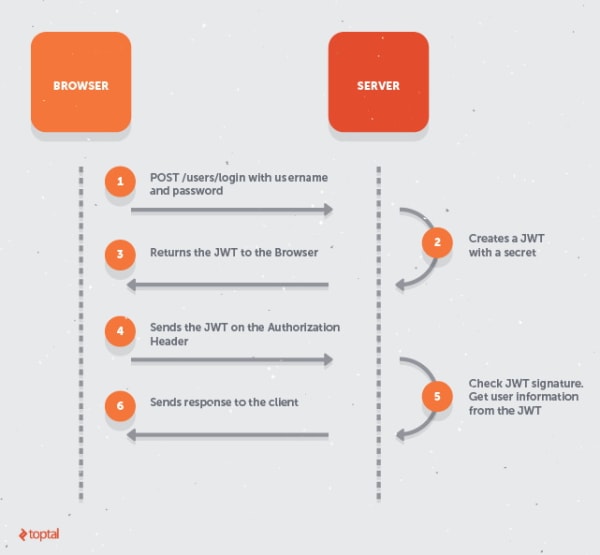
Before getting down to the nitty gritty, here’s a brief walk through of the process above. The client begins by making an HTTP POST request to the API to sign in using a username and password. The server looks at the incoming request and verifies that the username and password match, upon which the server generates a JWT based on the user information and a secret and then sends it back to the now authenticated user. In all subsequent API calls that the client makes, it will pass the JWT along with the request, making it possible for the server to always check the user information and if the token is coming from the correct source. Once checked, the server returns a response, either allowing the user to proceed or not.
To dig even deeper into how Internet communication works on a lower level, hop on an eventful journey in my article What Happens When You Type a URL and Press Enter?
Hashing and Salting Passwords Using Bcrypt
Feel free to enter zen mode. If a database gets breached, giving malicious actors access to users' passwords, they can easily start automating the process of trying to log in on various accounts using those stolen credentials. That is, if the passwords are stored in plaintext. Thus, when storing a password we should first convert it to an unreadable string that cannot be converted back to the original form. This is the job of a hash algorithm.
To hash a password we can use the well-known bcrypt algorithm with the help from the bcrypt library that we will install and import in our Node.js application. Since we cannot take the hashed password and convert it back to the original string, when authenticating a user (e.g. in a login attempt) the server rehashes the provided password using the same algorithm and compares it to the stored hash, granting access if they match.
To add yet another layer of security, the bcrypt algorithm also adds a salt (a random string) to the password when entering the hashing process. The resulting hash will consequently be unique. So even if ten users have the same password, none of them will look the same in the database. In order to be able to match a hashed and salted password you would then need, not only the plaintext password, but the original salt when recreating the hash. The complexity of the salt can also be modified by specifying the number of rounds you want the algorithm to run.
Have a look at an example of a hashed and salted password using bcrypt in Node.js:
const bcrypt = require('bcrypt');

async function hash(plainTextPassword) {
  const SALT_ROUNDS = 10;
  const salt = await bcrypt.genSalt(SALT_ROUNDS);
  const hashed = await bcrypt.hash(plainTextPassword, salt);

  // $2b$10$88tw55hlOSc0TiQv8Vn7tO
  console.log(salt);

  // $2b$10$88tw55hlOSc0TiQv8Vn7tO9CB5VS1cQD8mkWLaUZp3a7oDuUwzZJW
  console.log(hashed);
}

// invoke the hash function
hash('password12345');
Moreover, bcrypt’s design has yet another security layer--it’s slow. That may sound contradictory, but it is very purposefully a slow algorithm. The faster a hashing algorithm, the more hash calculations a hacker can perform per second. Consequently, hacker tools need to spend more time trying. Without going into detail, bcrypt also allows for decreasing its speed as computer performance increases so as to compensate for more efficient computers.
Back to our login scenario. Below you will initially find some code for handling an incoming HTTP POST request to the signup route, followed by a route handler for a similar request but to the signin route where the passwords will be compared using the bcrypt method compare() which returns a boolean. (Mongoose is used as the ODM to communicate with a MongoDB database.)
const bcrypt = require('bcrypt');
const mongoose = require('mongoose');
const express = require('express');
const User = require('./models/user');  // the users collection
const app = express();

// parse JSON objects before handling the HTTP requests
app.use(express.json());

// sign up a user
app.post('/api/signup', async (req, res) => {
  try {
    // validate the body of the request
    // (the "validate" function definition is not shown)
    const { error } = validate(req.body);
    if (error)
      return res.status(400).send(error.message);

    // see if the user already exists
    let user = await User.findOne({ email: req.body.email });
    if (user)
      return res.status(400).send('User is already registered.');

    // create a new user in memory
    user = new User({
      username: req.body.username,
      email: req.body.email,
      password: req.body.password
    });

    // hash the password
    const SALT_ROUNDS = 10;
    const salt = await bcrypt.genSalt(SALT_ROUNDS);
    user.password = await bcrypt.hash(user.password, salt);

    // save the user to the db
    await user.save();

    // return the user (omit the password)
    res.send({
      username: user.username,
      email: user.email
    });
  }
  catch (err) {
    return res.status(500).send('Oops.. Something went wrong.');
  }
});


// sign in a user
app.post('/api/signin', async (req, res) => {
  try {
    // validate the body of the request
    // (the "validate" function definition is not shown)
    const { error } = validate(req.body);
    if (error)
      return res.status(400).send(error.message);

    // see if the user exists
    const user = await User.findOne({ email: req.body.email });
    if (!user)
      return res.status(400).send('Invalid email or password.');

    // authenticate
    // (the "compare" method returns a boolean)
    const authenticated = await bcrypt.compare(
      req.body.password, user.password
    );
    if (!authenticated)
      return res.status(400).send('Invalid email or password.');

    // respond to client
    res.send(/* will return an authorization token shortly */);
  }
  catch (err) {
    return res.status(500).send('Oops.. Something went wrong.');
  }
});
Do note a few things: (a) we always want to validate the input from the user before querying the database (e.g. checking the types, maximum and minimum lengths, etc.), one reason being that it could contain data that may alter the database in ways we don’t expect; (b) we do not reveal to the user if it is the email or the password that is incorrect in order to be less conspicuous. (One popular library for validation is joi.)
The first argument (req.body.password) to the compare() method is the user input (the plaintext password), the second argument (user.password) is the hashed password stored in the database. When this method gets called, bcrypt hashes the plaintext password and checks if the two matches. This is done internally by passing the plaintext password as the first argument to bcrypt.hash() and a salt as its second argument. The salt needs to be the same exact salt that was used when hashing the password already stored in the database. Since we are not explicitly passing the salt, bcrypt.compare() first retrieves it from the hashed password (using String.prototype.substr()) since the salt was placed onto that hash. Now the plaintext password can be fully hashed and compared to the already hashed one. Notice how this hash mechanism is clearly a one-way street. The hashed password from the database is never decrypted!
An important side note worth mentioning is that some bcrypt code examples online might show you a synchronous version of bcrypt, but try to always use the asynchronous version as Node.js is single threaded, meaning it can only do one thing at a time. So to not block the event loop while hashing, you would want to use an async operation. When using bcrypt inside of a synchronous method, however, you would have no choice but to go with the sync version.
Even though bcrypt is a great algorithm for hashing data, there is no guarantee a password won’t be cracked. Using two-factor authentication (2FA) on top of your account definitely slows down an attacker, giving you time to change the password.
The backend authentication implementation is now set up. Although, in order for the application to know if the user is logged in or not, and for the server to be able to authorize certain requests by the user, the user needs its “ID card”, or token. In the first diagram we saw that the server creates a JWT and sends it back to the client if the correct credentials were entered. In our current implementation, even if we are responding with a 200 OK status code (as we implicitly are doing), the absence of a valid token prevents the user from actually logging in as that will be our means of authorization. Hence, the time has come to dissect the JSON Web Token.
The Anatomy of a JSON Web Token
A JWT is a plain string encoded from JSON objects. This string, when decoded, reveals information about a particular user or party. A logged in user who is navigating from one page to another are constantly making new HTTP requests, so in order for the application to not send you back to the login page we need some silent way of checking (a) if you are still logged in (authenticated), and (b) if you are allowed access to what you are requesting access to (authorized).
A traditional way of solving this is by use of cookies. After authenticating the user, a cookie (a tiny little text file) is placed on the client and a session is stored in server memory. The cookie is then sent to the server each time the user makes a new request. If a session is found, the user is considered authenticated.
A more modern solution is giving the client a token to send back to the server with each request. A JWT is made up of three parts (separated by dots):
header.payload.signatureThe header stores information about what kind of token is being used and what algorithm to run to create the signature part.
// header
{
  "alg": "HAS256",
  "typ": "JWT"
}
Most commonly, the cryptographic hash function HMAC-SHA256 is used.
The payload stores information about the user such as id, name, or if the user is an admin. Any data pertaining to the user can be put onto this JSON object, but do not put sensitive information here for reasons that will be obvious very soon. By including, for instance, an admin (or role) property, we won’t have to query the database again to check if the user is an admin or not, which would otherwise increase the response time. (The payload information is called "claims" .)
// payload
{
  "_id": "12345",
  "name": "Steven",
  "isAdmin": "true"
}
The header and the payload are then separately encoded using the Base64Url encoder and turned into strings. Taking the same JSON objects as in the previous examples, the encoded strings will be:
// eyJhbGciOiJIUzI1NiIsInR5cCI6IkpXVCJ9
base64UrlEncode(header);

// eyJfaWQiOiIxMjM0NSIsIm5hbWUiOiJTdGV2ZW4iLCJpc0FkbWluIjoidHJ1ZSJ9
base64UrlEncode(payload);
The signature is a bit more complex (see below). To generate this last part of the token we need to pass two arguments to the hashing algorithm function specified in the header (HMAC-SHA256). The first argument is the encoded header concatenated with the encoded payload (in that order separated by a dot). The second argument is a secret key, or rather, a super secret key. The output (the hashed data) is subsequently Base64Url encoded, creating the signature.
// the steps taken to create the JWT signature

data = base64UrlEncode(header) + '.' + base64UrlEncode(payload);
hash = hmacsha256(data, secret);
signature = base64UrlEncode(hash);
Let’s say I provide the string "123myLittleSecret" as the secret, our signature and JWT will come out looking like so:
// signature
6HrjY0BFB0yaFpdRVcxwR55ulZlw3R5OYjA3RrCI49w

// JWT ( header.payload.signature )
eyJhbGciOiJIUzI1NiIsInR5cCI6IkpXVCJ9.
eyJfaWQiOiIxMjM0NSIsIm5hbWUiOiJTdGV2ZW4iLCJpc0FkbWluIjoidHJ1ZSJ9.
6HrjY0BFB0yaFpdRVcxwR55ulZlw3R5OYjA3RrCI49w
Since the signature is based on the information stored in these objects, any tampering with this data will generate a completely different signature (and token). JWTs thereby come in extremely handy when we want to make sure the message has not been altered and when we need to check if the users are who they say they are.
Nonetheless, it is important to note that a JWT does not(!) encrypt your data. The header and payload strings can easily be decoded, allowing for anyone to see what is in them if they get access to it. You can try it yourself at jwt.io. This is the reason why (a) no sensitive information should be placed in these JSON objects, (b) the tokens should reside on the client side, and (c) transfers of tokens should always use the secure protocol HTTPS. It is also common practice to place an expiration time on these tokens as to invalidate them should someone get access to an old one. In short, these tokens are used to more easily transfer data (strings being quite easy to handle) and for verifying that the data has not been tampered with. Since the key is a super secret (because it verifies the user) it should not be hanging around in the code base somewhere hoping not to be found. Instead, that is a good use case for an environment variable.
Using Environment Variables to Store Secrets
Environment variables allow you to set different configuration settings depending on the environment. For instance, you might (and should) want to work with a separate database for your testing environment, have your app listen on different ports, or perhaps, as in this case, set a custom variable like a secret key to use when signing a token. In Node.js, these variables are accessed through:
process.envThe global object process has a property env which is an object where all your environment variables are stored. An easy and popular way of adding variables to this object is through a library called "dotenv". After installing it, require and configure this library as early as possible in your application.
require('dotenv').config()Create a .env file in your project’s root directory and add your variables in the format NAME=VALUE. Let’s add our secret key variable.
// in root/.env

SECRET_KEY=mySecretKey
Hold on, didn’t I just say not to store these secrets in the code base? Don’t worry, we won’t be using that hardcoded value. We just want a name for it so that we can set that environment variable outside of the application (using a different key). In production, you should force the application process to shut down with a non-zero exit code if the secret key has not been set, meaning if it is “mySecretKey” in our case, using process.exit(0). To set the key, type from the command line:
// on Windows
set SECRET_KEY=shf678f7982HDi87udSHebrfou12

// on Mac and Linux
export SECRET_KEY=shf678f7982HDi87udSHebrfou12
Generating the JWT
Refocusing our attention on the JWT, let’s add the missing piece to our signin route handler, i.e. generating and returning the token (you can add the same additional code for the signup handler if you want the user to be logged in afterward). For this, we will be using the "jsonwebtoken" library.
// sign in a user

const bcrypt = require('bcrypt');
const mongoose = require('mongoose');
const express = require('express');
const jwt = require('jsonwebtoken');
const User = require('./models/user');
const app = express();

app.use(express.json());

app.post('/api/signin', async (req, res) => {
  try {
    const { error } = validate(req.body);
    if (error)
      return res.status(400).send(error.message);

    const user = await User.findOne({ email: req.body.email });
    if (!user)
      return res.status(400).send('Invalid email or password.');

    const authenticated = await bcrypt.compare(
      req.body.password, user.password
    );
    if (!authenticated)
      return res.status(400).send('Invalid email or password.');


    /* --------THIS IS WHERE WE LEFT OFF--------- */


    // generate a JWT
    const token = jwt.sign(
      {
        _id: user._id,
        username: user.username,
        isAdmin: user.isAdmin
      },
      process.env.SECRET_KEY,  // access the environment variable
      { expiresIn: '1h' }
    );

    // return the token to the client
    res.send(token);
  }
  catch (err) {
    return res.status(500).send('Oops.. Something went wrong.');
  }
});
The sign() method follows the standard:
jwt.sign(payload, secretKey, [options, callback])If no callback is supplied (as in our case), the operation is synchronous. The payload can also be a string, but for readability it is usually passed as an object (which will be converted into a string from within the method itself using JSON.stringify(). The function jwt.sign() returns a token, but as we have learned, a header specifying what algorithm to use when hashing the encoded payload and header is also needed in order to generate the token. If omitted, this function will by default use HS256 as previously seen, but you could pass an option to use another algorithm like RS256 (an asymmetric version).
jwt.sign(payload, secretKey, { algorithm: 'RS256' })Sending the Token to the Server
Thinking back at the step-by-step diagram up at the very top, our frontend now needs to store the token so that it can send it back to the server to be verified in subsequent requests. A common place of storing tokens is in local storage, although this makes it vulnerable to cross-site scripting (XSS) attacks. Another option is to store them in cookies, which are not susceptible to XXS, but instead susceptible to cross-site request forgery (XSRF). As in most cases in the world of programming, there are various kinds of trade-offs. Choosing local storage for now, we can place the token there by means of localStorage.setItem(<key name>, <key value>). We can then access it through local storage, decode it with the "jwt-decode" library, grab the user information, and set the user.
// perform client side

// how to store the token using "localStorage" (or "window.localStorage")
localStorage.setItem('jwtToken', token);

// note: localStorage can only store strings, thus you can also
//        use JSON.stringify to make sure the stored item is a string
localStorage.setItem('jwtToken', JSON.stringify(token));

// how to retrieve the token from localStorage
localStorage.getItem('jwtToken');

// note: if the stored item should be something other than a string
//        once retrieved, use JSON.parse
JSON.parse(localStorage.getItem('jwtToken')) || '';

// how to decode the token
import jwtDecode from 'jwt-decode';
const decodedToken = jwtDecode(localStorage.getItem('jwtToken'));

// note: jwtDecode will throw an error if the token is falsy,
//        so you might want to wrap it in a try-catch block
const decodeToken = (token) => {
  try {
    return jwtDecode(token);
  }
  catch (err) {
    return null;
  }
};
The "jsonwebtoken" library that we use on the server has a built-in decode method as well, but since the client side only needs to decode we can save some space by using the smaller Base64Url decoder library "jwt-decode". (This only decodes, it does not verify the signature.)
Still on the client side of things, we can send the token in the authorization header which follows the pattern:
Authorization: <type> <credentials>Our type will be of Bearer and we can then set the header after receiving the token from the server with the help of the "axios" library. This header will be sent on each subsequent request to the server.
// perform client side

// how to set the authorization header
import axios from 'axios';
axios.defaults.headers.common['Authorization'] = `Bearer ${token}`;
Verifying the Token Using Middleware
So far there is no implementation on our backend for checking whether or not the user is logged in or if it is the correct logged in user (we are currently only handling requests to the signup and signin endpoints), but we only have about one and a half more steps to go (the half a step being to grant or not to grant the user access).
In the Node.js environment we have the concept of middleware. A middleware is essentially a function that runs before or after a particular operation. For instance, when an API call is made containing data in the body of the request, we need to parse that JSON object into a regular JavaScript object before we can access its properties. That parsing step is an example of a middleware, and there could be as few or as many of them as we’d like. As the name suggests, these functions run in between a request and response, so when one of them has finished executing its code, we call a function conveniently named next() to pass the request on to the next middleware. Our verification steps that we need to implement are great examples of middleware as users need to be authorized before being allowed access to certain resources. The server will receive the token from the client in the authorization header, thus we will start by retrieving it. Let’s have a go at the code and then discuss it further.
const jwt = require('jsonwebtoken');

// make sure the user is logged in
function verifyLoggedIn(req, res, next) {
  try {
    // retrieve the token
    const token = req.headers.authorization.split(' ')[1];

    // verify and decode the token
    jwt.verify(token, process.env.SECRET_KEY, (err, decoded) => {
      if (err)
        return res.status(401).send('Invalid token.');

      // store the decoded payload
      req.user = decoded;

      // pass control to the next middleware
      next();
    });
  }
  catch (err) {
    res.status(401).send('Access denied. No token provided.');
  }
}

// make sure the request is coming from the correct user
function verifyUser(req, res, next) {
  try {
    // retrieve the token
    const token = req.headers.authorization.split(' ')[1];

    // verify and decode the token
    jwt.verify(token, process.env.SECRET_KEY, (err, decoded) => {
      if (err)
        return res.status(401).send('Invalid token.');

      // compare the client id and the one stored in the payload
      if (decoded._id !== req.params.id)
        return res.status(401).send('Unauthorized request.');

      // store decoded payload
      req.user = decoded;

      // pass control to the next middleware
      next();
    });
  }
  catch (err) {
    res.status(401).send('Access denied. No token provided.');
  }
}

exports.verifyLoggedIn = verifyLoggedIn;
exports.verifyUser = verifyUser;
The authorization header contains the string "Bearer <token>". We can retrieve the token by using the built-in JavaScript method split() to split the string into an array of two elements, placing the token on index 1 (make sure to pass in a string with a whitespace character as the argument to this method). If no token is provided, trying to access the element on index 1 will throw an error which will be caught by the catch block. We then go on to verify that it is a valid token. The jwt.verify() standard is:
jwt.verify(token, secret, [options, callback])During the verification process, the token provided is decoded and when that output is signed with the secret (the second argument) the signature generated is compared to the signature of the provided token. Remember, a JWT is made up of header.payload.signature and the signature depends on all other parts. A callback has been provided to jwt.verify() that will be called with an error or with the decoded payload when the verification is completed. If only verifying the validity of the token and that the user is logged in we store the decoded payload onto the user object, but if also verifying that the token is being sent from the correct source we need to compare the ids of the one making the request and the one in the decoded payload before storing it. Last step is to pass the request on to whichever next function should handle it, whether it’d be another middleware or the last step in the request processing pipeline.
Creating the middleware is one thing, we need to use them somewhere as well. Let’s say a user navigates to its inbox to check its private messages and the client-side code is set up to be hitting the GET /api/users/:id/messages endpoint. The server needs to verify this request in order to see if this user is authorized to access these messages by importing and using our verifyUser() middleware. By placing the middleware before the main route handler, it will always be executed before passing the request through.
const { verifyUser } = require('../middleware/auth');

// place the "verifyUser" middleware in the middle
app.get('/api/users/:id/messages', verifyUser, async (req, res) => {

  // the code inside of this route handler will run only
  // after the request has successfully passed through "verifyUser"

});
When using several middleware, for instance some authorization middleware followed by a role based authorization middleware for various routes, you may implement it like so:
const auth = require('../middleware/auth');
const admin = require('../middleware/admin')

// place the middleware in the middle
// (in the order you want them to run)
app.delete('/api/books/:id', [auth, admin], async (req, res) => {

  // the code inside of this route handler will run only after
  // the request has successfully passed through "auth" and "admin"

});
The Express body parser that parses JSON objects is, as mentioned, another middleware function. This function is bound to the app object by using app.use() early in the application (or at least before the route handlers), demonstrating yet another way of applying middleware. (The order in which the request should pass when calling next() is reflected by when it is introduced in your code.)
app.use(middlewareA);  // A runs first
app.use(middlewareB);  // A passes request to B if OK
app.use(middlewareC);  // B passes request to C if OK
Exiting Zen Mode and Logging Out
We have reached the finish line and you can exit zen mode now. We have gone through each of the six steps laid out in the first diagram. There are of course many more details underlying the presented methods which I am sure you can sink your teeth into if you’d like. Nonetheless, various security solutions worth implementing in one way or another when building applications have been presented. Since really comprehending your code (and not just knowing how to code) will accelerate your learning curve, help in debugging, and improve your security awareness, digging just a bit deeper into some of the concepts hopefully contributed to your life as a developer.
I do want to mention a tiny last part. You might be wondering how we log users out? Well, because the existence of a valid token is what considers a user logged in, all we do is remove that token. The "axios" library helped us place the token onto the header, it can help us remove it as well.
// perform client side

import axios from 'axios';
delete axios.defaults.headers.common['Authorization'];
Don’t forget that we stored the token in localStorage, so make sure to remove it. (Users should also be redirected away from the logged in part of the application.)
// remove the token
localStorage.removeItem('jwtToken');

// or clear the entire local storage
localStorage.clear();
The dangerous part of all of this is that you only know what you know, or rather, you don’t know what you don’t know. To protect your application against something you don’t even know exists is pretty challenging. So if you are not using an existing security solution, you might want to invest a few moments on this topic. Hey, it might even turn out to be super fun!
Keep Coding and Stay Curious! :)
Comments powered by Talkyard.
Comments powered byTalkyard.